How to Take a Measurement Using the IC-CENTER530 Light Meter

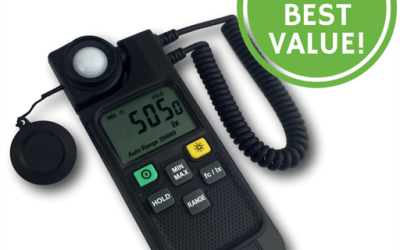
The IC-CENTER530 is the ideal light meter for simple lighting investigations. Budget-friendly yet feature-rich, this meter features a robust, rotatable and detachable sensor and a wide measurement range, making it well-suited to indoor and outdoor applications.
Figure 1 Watch an Instrument Choice setup and demonstrate how to set up and take a measurement using the IC-CENTER530 Light Meter here.
How to Take a Lux Measurement Using the IC-CENTER530 Light Meter
Setup and Functions
- To turn the meter on, press the power button.
- Each time you turn the device on, the meter will perform an automatic zero calibration. 'CAP' will blink on the screen as this is happening. Press no buttons as this happens and ensure the sensor cover is on.
- After the zero calibration is complete, CAL will appear briefly, and then the unit will move on to measurement mode. Remove the sensor cap.
- Press the MAX/MIN button once to display the current maximum reading
- Press the MAX/MIN a second time to view the minimum reading
- Pressing the MAX/MIN a third time shows the device is in MAX MIN mode and will display the current light level reading. MIN and MAX will blink on the LCD screen.
- To exit this mode, press and hold the MAX/MIN button for two seconds.
- If you would like to record minimum and maximum measurements;
- Select the desired unit between lux and footcandles by pressing the 'fc/lx' button. Generally, lux is the measurement unit used where the metric system is in place. Footcandle is the measurement unit used where the imperial measurement system is in use.
- The range button enables you to select the preferred measuring range or allows the meter to choose the range, based on measurements automatically. For lux, the available ranges are AUTO, 200 lx, 2000 lx, 20000 lx, 200000 lx
How to Take a Measurement
- Remove the sensor cap, and ensure nothing is obscuring the sensor.
- Rotate the sensor towards the light source to be measured. Alternatively, detach and hold toward the light to be measured.
- Wait for the reading to stabilise.
Conclusion
The IC-CENTER530 is a feature-rich light meter that is capable of performing a wide range of simple lighting investigations, both indoors and outdoors.
For more information on this light meter, see the additional links below or contact us!
Additional links
- View the IC-CENTER530 complete features and specifications here.
- Watch 'How to Take a Measurement Using the IC-CENTER530 Light Meter' again.
- Want to know what comes with the IC-CENTER530 Light Meter? Watch an Instrument Choice Scientist 'Unbox the IC-CENTER530 Light Meter'
- Want more information on light meters? Read the Instrument Choice articles;
Also interesting
The CME4 concrete encounter moisture meter facilitates straightforward and regular checking of moisture content during the drying out phase of a laying a new concrete floor or screed. Checking moisture content levels during this period is essential to ensure that your concrete is dry enough to accept floor coverings. Failure to monitor moisture content risks latent problems such as adhesive failure, condensation, or warped floorboards.

Professional and affordable, the VT110s Thermo-Anemometer measures air velocity and temperature, calculates airflow, and has a host of convenient features to make taking measurements almost effortless. Instrument Choice Scientists have detailed six essential setup functions and set them out in straightforward steps to help you configure and start using your VT110s.

