How to Setup the Eutech EC-PCSTestr35 Waterproof Multi-Purpose Meter

The EC-PCSTestr35 allows you to customise various parameters and settings to optimise the meter for your specific application. In this step-by-step guide, we run through the parameter and system setup for the EC-PCSTestr35 to help you get the most from your Eutech multiparameter meter.
Figure 1 Watch an Instrument Choice scientist calibrate the EC-PCSTestr35 Waterproof Multi-Purpose Meter here.
How to Setup the EC-PCSTestr35 Waterproof Multi-Purpose Meter
Parameter Settings
- Under parameter settings, you can make changes relating to the following parameters; pH, Salinity, TDS, and Conductivity. To enter into parameter setup, start with the meter off. Press and hold the MODE button, then press and release the ON/OFF button.
- ‘SET UP’ will appear, then as you let go of the mode button, ‘PARA’ will appear. Press ‘HOLD’ or ‘CAL’ to move between the two menu options.
- To set up parameters, press MODE when ‘PARA’ is on the screen.
pH
- The first menu parameter selection menu is pH. Enter into pH by pressing the ‘MODE’ button.
- Here you can select between USA (1.68, 4.01, 7.00, 10.01, 12.45) or NIST (1.68, 4.01, 6.86, 9.18, 12.45) calibration buffer groups.
- Use ‘CAL’ or ‘HOLD’ to select between the two buffer groups then press ‘MODE’ to confirm. Once confirmed, the chosen value will blink on the screen before the unit moves on.
- The next pH parameter selection is the number of buffer points for calibration. Use ‘CAL’ or ‘HOLD’ to select between 3-point or 5-point calibration. Press ‘MODE’ to confirm.
- When complete, the unit automatically exits the parameter. Pressing ‘CAL’ or ‘HOLD’ now will move onto the next parameter, which is Salinity (‘SALt’).
Salinity
- Press hold and then mode to enter the salinity setup.
- Press ‘CAL’ or ‘HOLD’ to choose a displayed unit of measurement between ‘PPt’ (parts per thousand) or ‘Per’ (percentage %).
- Press ‘MODE’ to confirm your choice and exit out of the salinity options and back to the main parameter menu.
TDS
- Press ‘HOLD’ to move onto the TDS setup and press ‘MODE’ to enter.
- Here you can use the ‘CAL’ or ‘HOLD’ buttons to change the conversion factor the instrument uses to convert results from conductivity to TDS. The conversion factor is adjustable from 0.40 to 1.00, and the meter defaults to 0.71. Press ‘MOD’E to confirm and exit the TDS parameter setup.
Conductivity
- Press hold to move onto conductivity. Press ‘MODE’ to enter.
- The first selection is to choose between automatic calibration (‘YES’) or manual calibration (‘NO’). The PCTestr35 and PCSTestr35 are capable of automatic or manual conductivity calibration.In automatic calibration mode, the meter will automatically choose one of three conductivity calibration standards, depending on the ranges listed in figure 1 (below).If you will only be calibrating to either; 84 µS, 1413 µS, or 12.88 mS calibration standards, automatic calibration is recommended. Otherwise, select ‘MANUAL.’
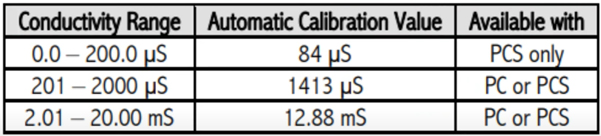
Figure 2 Automatic calibration standards of the Eutech EC-PCSTestr35
- When selected, press ‘MODE’ to save.
- The next conductivity option offers a selection between a single point (‘YES’) or multi-point (‘NO’) calibration. Use single-point calibration to apply a single calibration value across all ranges. Selecting multi-point calibration will restrict an individual calibration applying it to one range only. So, for best results when using multi-point calibration, perform calibration for each range you expect to use.
- Press MODE to confirm.
- Pressing HOLD again to move to the next parameter will now take you back to the start of the menu (That is, pH parameter setup).
- If you are happy with all your selections, you MUST now save the selections before exiting. To save, press, and hold both ‘HOLD’ and ‘CAL’ simultaneously until you see ‘SA’ appear on the screen.
- When the primary display shows ‘SA’ and the secondary display ‘YES,’ press ‘MODE’ to save the changes. The instrument will resume measurement mode with the updated parameter setting(s).
- The parameter setup is complete.
System Settings
- To enter into the system setup again, start with your meter off. Press and hold the ‘MODE’ button and then press and release the ‘ON/OFF’ button.
- Press ‘HOLD’ or ‘CAL’ until ‘SYST’ displays, then press ‘MODE’ to enter.
- The first option is ‘UNIT rst.’ Press ‘MODE’ to enter.
- The first option is selecting a reset between PH (‘pH’) or EC (‘Electrical Conductivity / TDS / Salinity’).
- When a parameter is selected, you can choose the type of reset between ‘CAL’ (calibration reset) or ‘FCt’ (Reset to factory default settings).
- The next setting is ‘Set.’ Here, you can select temperature units. Press ‘MODE’ to enter and ‘CAL’ or ‘HOLD’ to choose between Celsius or Fahrenheit. Press ‘MODE’ to save.
- The following option is ‘Set AtC.’ This setting is for turning on or off automatic temperature compensation. Use ‘CAL’ or ‘HOLD’ to choose between ‘Yes’ or ‘No’ (If no, 25°C is used).
- Next is ‘Set t.C’ the temperature coefficient setting. Use ‘CAL’ or ‘HOLD’ to adjust between 0.0-10.0%. The default is 2.1%.
- The next setting is ‘Set A.Off.’ The default automatic shut off is 8.5 minutes. Use ‘CAL’ or ‘HOLD’ to select ‘YES’ (on) or ‘NO’ (off).
- Pressing ‘HOLD’ again takes us back to the start. As with the parameter menu, it is vital to save selections here before returning to measurement mode.
- To repeat, press and hold ‘HOLD’ and ‘CAL’ until ‘SA’ appears on the screen.
- The upper display shows ‘SA,’ and the lower display is ‘YES,’ press mode to save the changes. The instrument will resume measurement mode with the updated setting(s).
- The parameter and system setup is complete. The unit is ready to be calibrated or used.
Conclusion
The extensive parameter and system setting options for the Eutech EC-PCStestr35 enable users to set the multiparameter meter up in the best way to suit their specific application.
For more information on the Eutech EC-PCSTestr35, check out the links below or contact us!
Additional links
- View the Eutech EC-PCSTestr35Waterproof Multi-Purpose Meter here.
- For more information and calibration tips, view the EC-PCSTestr35 User Manual here.
- Watch "How to Setup the EC-PCSTestr35 Waterproof Multi-Purpose Meter" again.
- Learn how to calibrate the Eutech EC-PCStestr35 in the video "How to Calibrate the EC-PCSTestr35 Waterproof Multi-Purpose Meter".
- View the full range of Eutech pH meters and more here.

Also interesting
The EL-WIFI-TH data Logger accurately measures the temperature and humidity of the ambient environment. The collected data is transmitted wirelessly via a WIFI network that can be accessed, shared, and saved via your PC or smartphone.

The EL-SIE-1 digital fridge thermometer enables you to take temperature readings, record temperatures at user-selected intervals, and set alarms for when temperatures breaches occur. One of the most popular uses for the EL-SIE-1 is to monitor fridge temperatures.
