The Instrument Choice Scientists regularly demonstrate how to set up some of your most popular products. In this edition, we explain how to set up the Hobo Data Logger UX100-003.
The Hobo Data Logger UX100-003, a temperature and humidity data logger with a high memory capacity, precision accuracy (within 3.5%), and an easy to read LCD. The UX100-003 is well-suited for almost any indoor monitoring application.
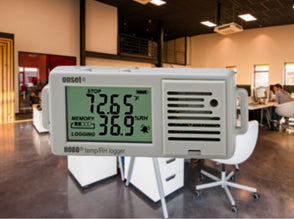
Figure 1 Watch an Instrument Choice scientist demonstrate how to set up the Hobo data logger UX100-003 Temp/RH 3.5% here
How to Setup the Hobo Data Logger UX100-003 Temp/RH 3.5%
Materials
You will need;
- Hobo Data Logger UX100-003
- USB Cable (Included)
- HOBOware Software (Included)
- Computer
Download Software
- Download the HOBOware free application. Find the link for this is in the additional links (below).
- Once downloaded, follow the prompts to install.
-
Open HOBOware and follow the prompts to complete the setup. The following
dialogue boxes will appear, make your selection and click next to move
between:
- USB/Serial Device Selection: Select “USB and Serial Devices” and choose a single port or select all ports.
- Unit Selection: Choose a unit system between SI or US.
- Data Assistant: Select to switch data assistants ON or OFF.
Setup Data Logger UX100-003
- Plug your Hobo data logger UX100-003 into a PC using the included USB cable.
-
Click “Launch Logger” icon in the top left corner.

Figure 1 "Launch Logger" icon on the HOBOware application
-
Click on the HOBO unit you wish to set up. It may take several seconds
to appear. Then click “OK”.
-
A dialogue box called “launch logger settings” will appear
with a range of set up options. Here you can:
- Name the device
- View the current status
-
Configure the logging sensors for temperature and
humidity, including:
- Turning temperature and humidity sensors ON or OFF
- High and low alarms
- Alarm modes - select between cumulative and consecutive; and
- How long to maintain a visual alarm.
- Under “Filters”: you can select a channel to filter and create logging rules.
-
Adjust deployment information including
logging interval adjustment,
logging mode adjustment (choose fixed,
burst or statistics). For burst and
statistics, additional dialogue boxes appear with adjustment
information.
- Burst logging; set the high and low limit to trigger burst logging and burst logging interval.
- Statistics logging; Choose what statistics you wish to log for each enabled sensor
- Choose when and how you would like the device to start logging.
- Choose when and how you would like the device to stop logging.
- Choose whether to keep the LCD screen ON or OFF. Note: Keeping the LCD turned off will conserve your battery life.
- After you have entered all options press “START.”
- Wait as the HOBOware software loads the settings onto the logger. When the load bar is complete, the logger can be unplugged from the PC. After removing the logger, you can observe your current measured temperature and humidity information on the screen, along with the indication of remaining memory, the operating status (logging) and battery status.
- The device is now set up and ready for installation in your desired monitoring location.
Download Data from the Data Logger UX100-003
- Plug the logger back into the computer using the included USB cable.
-
Click the “Readout Device” icon.

Figure 1 "Launch Logger" icon on the HOBOware application
- A dialogue box for “Plot setup” will open.
-
Select:
- The series you wish to plot
- The required display units
- The internal logger events you wish to plot; and
- Select the time offset from GMT.
- Once all options are selected, click “PLOT”.
-
The collected device information will appear split into two main
sections (see figure 3 below). The top section (a) has each collected
data log point, and below is a comprehensive and interactive graph
(b).

Figure 3 Device readout on HOBOware for the UX100-003
- See figure 4 (below) for a breakdown of the navigation bar for the graph.

Figure 4 Toggle selections in HOBOware (free)
|
a) Open saved data files b) Save current data file c) Close data file d) Export table data e) Print data f) Use the mouse to navigate the graph g) Use cross-hair to pain point data set h) Use grab and move tool on graph i) Zoom in on the graph j) Zoom in |
k) Zoom out l) Show graph at full scale m) Graph properties n) Turn all horizontal grid lines on/off o) Turn vertical grid lines on/off p) Toggle point markers on/off q) Convert units for all series r) Filter series data s) Add graph label |
Conclusion
The UX100-003 is an easy-to-use temperature and humidity data logger, suitable for most indoor environments. This logger is a perfect tool for monitoring occupant comfort in office buildings, tracking food storage conditions in warehouses, logging temperature trends in server rooms, and measuring museum humidity levels.
Want more information on the Hobo Data Logger UX100-003? See the links below or contact us!
Additional links
- View the Hobo Data Logger UX100-003 here
- Download the HOBOware free application
- Watch "How to Setup the Hobo Data Logger UX100-003 Temp/RH 3.5%"
- Want to see what comes in the box? Watch an Instrument Choice scientist Unboxing the Hobo Data Logger UX100-003
- Click here to browse all Hobo data loggers at Instrument Choice, or;
- Browse all data loggers at Instrument Choice
